Bun Is A Lightweight All-in-one Javascript Runtime.

Meet Khansa Mueen, a versatile and dynamic professional whose passion for technology knows no bounds. As a Community Lead, Full Stack Developer, Mentor, Technical Writer, and lifelong learner, Khansa has a wealth of experience delivering innovative and effective solutions. With a proven track record of working on projects of all sizes, She is a self-motivated, self-driven individual always eager to tackle new challenges.
She is a true leader in the tech community, currently serving as a Community Lead and Mentor at Tech Hatch, where they empower Pakistani youth by bridging the gap between education and work. With their technical expertise and organizational skills, she is dedicated to making a positive daily impact.
As a lifelong learner, She brings a fresh perspective to every project, constantly adapting traditional techniques to modern initiatives. Their passion for hackathons and community involvement is a testament to their dedication to the industry. Join Khansa on their journey of growth and discovery in the ever-evolving world of technology.
Most likely, you've run into a JavaScript bundler before. This is relatively well handled by tools like Rollup or Webpack, but something amazing is on the horizon.
Let me introduce you to Bun, a bundler you should be familiar with if you plan on developing JavaScript in the near future.
Jarred Sumner, a former frontend programmer at Stripe, developed the project Bun, which calls itself "experimental software." The MIT licence makes it open-source. Yesterday, Sumner unveiled Bun's public beta, calling it
“an incredibly fast all-in-one JavaScript runtime.”
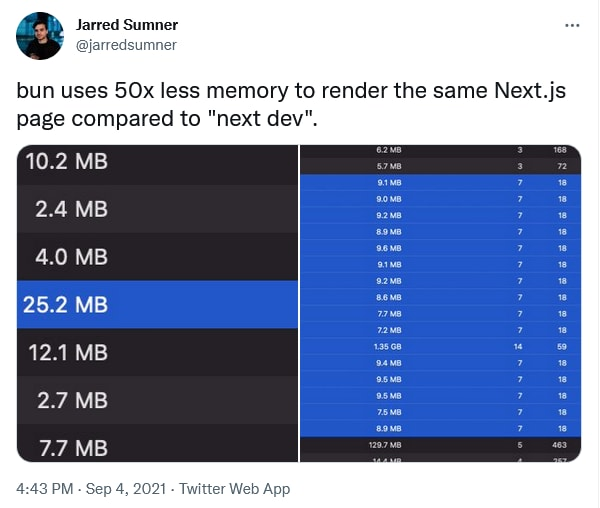
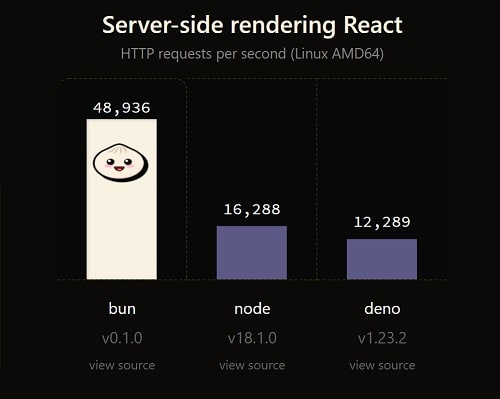
He claimed on Twitter that it can bundle more than a million lines of JavaScript every second.
Bundle, transpile, install and run JavaScript & TypeScript projects — all in Bun. Bun is a new JavaScript runtime with a native bundler, transpiler, task runner and npm client built-in.
PLEASE ELABORATE ON BUN:
A contemporary JavaScript runtime similar to Node or Deno is Bun. It was created from the ground up with three key objectives in mind:
- quick start (It considers the edge).
- higher standards of performance (expanding the engine's JavaScript Core).
- as a fantastic and comprehensive tool (bundler, transpiler, package manager).
LET'S DISCUSS ITS PERFORMANCE ⚡
Instead of the V8 engine, which is usually regarded as being quicker, JavaScript Core from WebKit is used. Additionally, the author of Bun stated that ZIG, a low-level programming language comparable to C or Rust, lacks concealed control flow, making it considerably easier to build quick applications.
For developers, the presentation on the official website checks a lot of boxes. Similar to Deno, Bun also takes JavaScript and TypeScript with automated transpilation. The React JSX (JavaScript XML) syntax is also translated by Bun. Both CommonJS and EcmaScript modules (ESM) are supported for Node.js module resolution, although ESM is utilised internally because it is the web standard.
However, this implies that a lot of npm packages function. Using bun:ffi, native code may be invoked from Bun JavaScript (foreign function interface). Also included is a SQLite database engine.
Most of Bun is written from scratch including the JSX/TypeScript transpiler, npm client, bundler, SQLite client, HTTP client, WebSocket client and more,” states the description.
STARTING OUT WITH BUN:
Run this install script in your terminal to install bun. From GitHub, Bun is downloaded.
curl https://bun.sh/install | bash
And it will display some output similar to this:
StatusCode        : 200
StatusDescription : OK
Content           : #!/bin/bash

                    # Reset
                    Color_Off=''

                    # Regular Colors
                    Red=''
                    Green=''

                    # Bold
                    BWhite=''
                    BGreen=''

                    Dim='' # White

                    if test -t 1; then
                        # Reset
                        Color_Off='\033[0m' # Text Reset

                        # Regular Colo...
RawContent        : HTTP/1.1 200 OK
                    Transfer-Encoding: chunked
                    Connection: keep-alive
                    x-origin-cache: HIT
                    access-control-allow-origin: *
                    x-proxy-cache: MISS
                    x-github-request-id: CC28:9668:148223F:1576AA7:62C7E60C
                    ...
Forms             : {}
Headers           : {[Transfer-Encoding, chunked], [Connection, keep-alive], [x-origin-cache, HIT],
                    [access-control-allow-origin, *]...}
Images            : {}
InputFields       : {}
Links             : {}
ParsedHtml        : mshtml.HTMLDocumentClass
RawContentLength  : 4906
The HTTP server designed by Bun is based on web standards such as Request and Response.
// http.js
export default {
  port: 3000,
  fetch(request) {
    return new Response("Welcome to Bun!");
  },
};
Run it through with a bun:
bun run http.js
Then, in your browser, navigate to localhost:3000. Additional samples may be found by reading the documentation.
That's all: Please hit the clap symbol a few times if you appreciated this article and want to help us spread the word 😊


